How To Set Up an eSIM on Android: Complete 2026 Guide
July 16, 2024
4.5

Last updated: 28 April 2026
By Caitlin Clark, SEO Copywriter, KnowRoaming. Reviewed by the KnowRoaming Connectivity Support Team (2,000+ Android installations analysed).
Setting up an eSIM on Android usually takes less than two minutes, but because Samsung, Google, Xiaomi, OnePlus, Oppo and other manufacturers each place settings in slightly different menus, the path isn't always obvious. This guide walks you through every step of how to set up an eSIM on Android, shows you the exact settings path for your device, and fixes the three issues that cause most installation problems, based on real data from 2,000 KnowRoaming support tickets.
Quick answer: how to set up an eSIM on Android
To set up an eSIM on Android, confirm your phone supports eSIM, connect to stable Wi-Fi, then open Settings > Network & Internet > SIMs > Add SIM, scan the QR code from your eSIM provider, wait for the profile to install, and turn on data roaming for the new eSIM. Installation usually takes under two minutes on Samsung, Pixel, Xiaomi, OnePlus and Oppo devices.
Before you start: the 30-second eSIM readiness check
Before installing your eSIM, confirm these three things. If all three are true, installation almost always works on the first try.
- Your phone supports eSIM. Not every Android phone does. Dial *#06# and look for an EID number, or check the KnowRoaming compatibility checker on any of our product pages.
- Your phone is unlocked. Phones that are network locked to a specific carrier can block eSIM activation from other providers.
- You have stable Wi-Fi. Your phone downloads the eSIM profile during installation. A weak connection is the quickest way to an "activation failed" error.
Meet all three and you're ready to go. If any one is missing, fix it before you try to install, otherwise you'll end up troubleshooting a problem you could have prevented.
Step-by-step: how to install an eSIM on Android
We recommend installing your KnowRoaming eSIM the day before you travel, on stable home Wi-Fi. Install early, activate on arrival. Don't switch it on until you land, otherwise you'll see an "activation failed" message because you're not yet in a supported destination.
Download our Android eSIM Installation & Set-Up Guide here, which covers the specific steps and screenshots to help you install and activate your eSIM on your Samsung device.
KnowRoaming gives you three ways to install. Pick whichever matches the format you received at checkout.
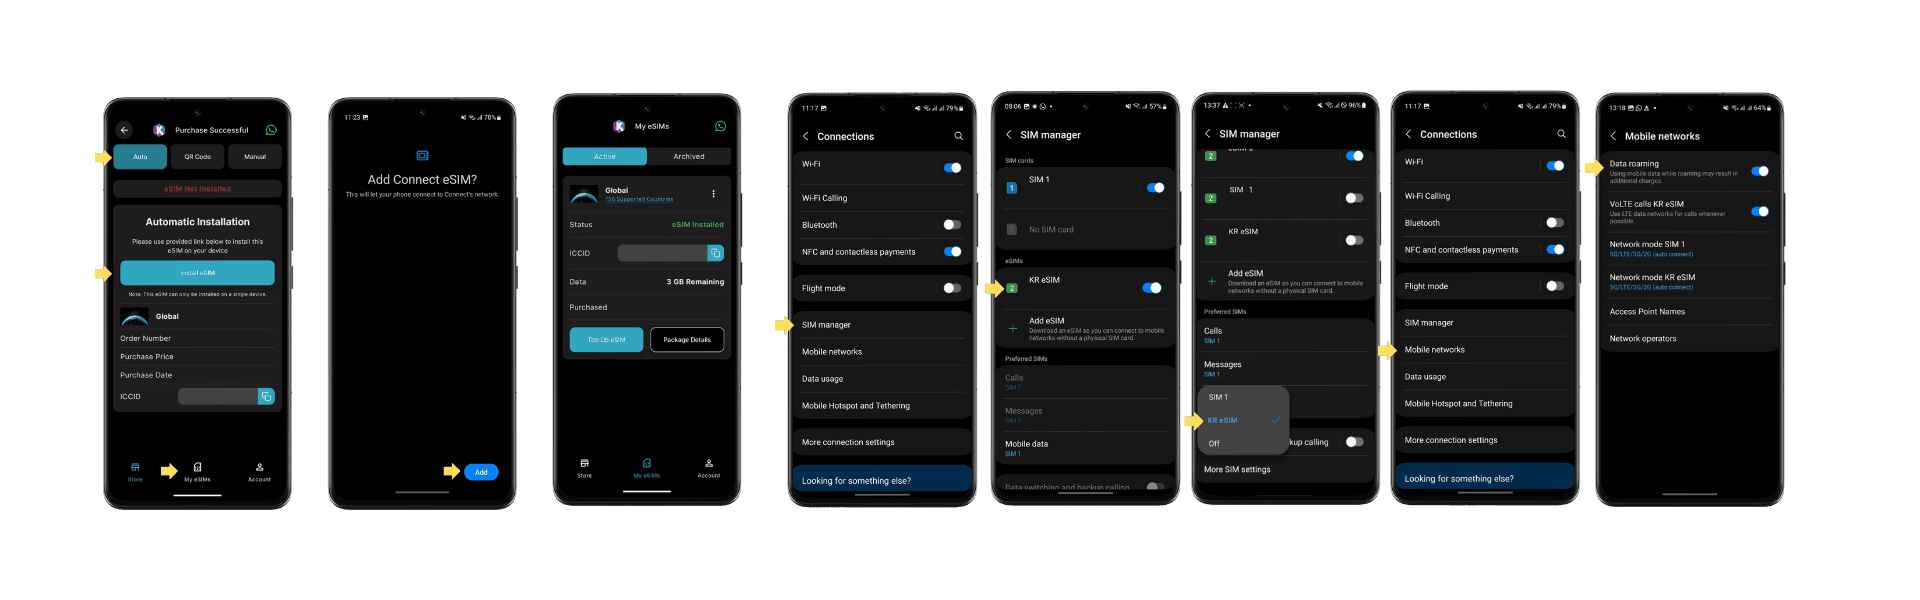
Option 1: Automatic installation via the KnowRoaming app (fastest)
The app does the setup for you in one tap.
- Download the KnowRoaming app from the Google Play Store.
- Sign in with the same email address you used at checkout.
- Click “My eSIMs” and select the eSIM package you wish to install. Tap on eSIM not installed.
- Confirm the install prompt on your Android device. The profile downloads and installs automatically. This takes up to 5 minutes.
- When installation finishes, rename the eSIM to something recognisable like "KR eSIM".
Leave the eSIM deactivated until you arrive at your destination (see the next section).
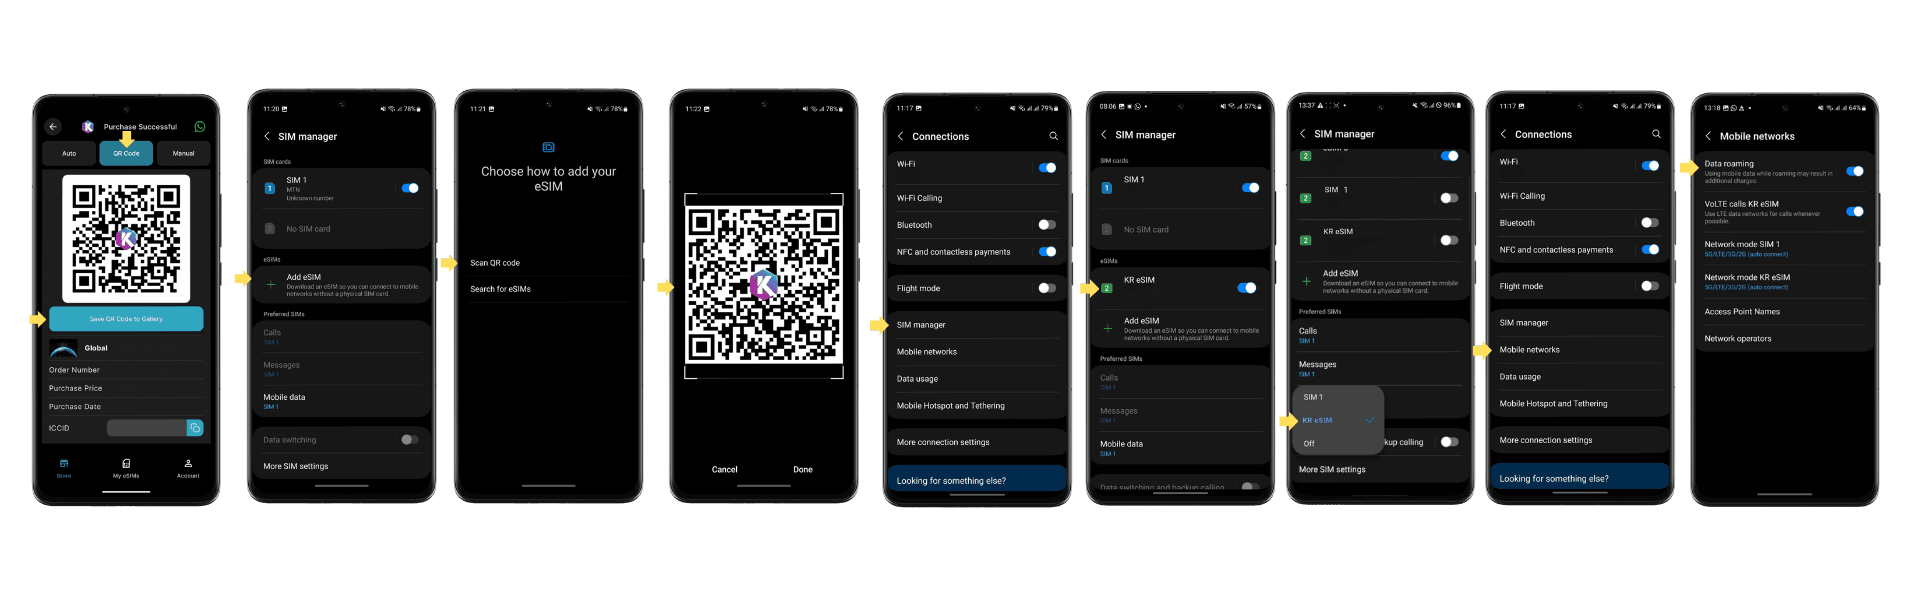
Option 2: QR code install
Use this if you received a QR code in your order confirmation email.
- On your Android phone, go to Settings > Network & Internet > SIMs (or Settings > Connections > SIM Manager on Samsung Galaxy).
- Tap Add SIM, Add Mobile Plan, or Download SIM (wording varies by manufacturer).
- Scan the QR code from your KnowRoaming confirmation email. If you're scanning on the same phone that received the email, save the QR as an image first, then use the Use image from gallery or Enter code manually option.
- Wait 30 to 90 seconds for the eSIM profile to install. Don't close the screen or change networks during install.
- Rename the eSIM to "KR eSIM" so you can spot it later.
- Leave the eSIM deactivated until you arrive at your destination (see the next section).
Option 3: Manual install with SM-DP+ address and activation code
Use this if scanning the QR fails, or if the app install option isn't available on your device.
- Go to Settings > Network & Internet > SIMs > Add SIM (or Settings > Connections > SIM Manager > Add eSIM on Samsung).
- Select Enter code manually or Enter details manually.
- Paste the SM-DP+ address and Activation Code from your KnowRoaming confirmation email or app and add it into the relevant fields.
- Confirm and wait for the profile to install.
- Rename the eSIM to "KR eSIM".
- Leave the eSIM deactivated until you arrive at your destination (see the next section).
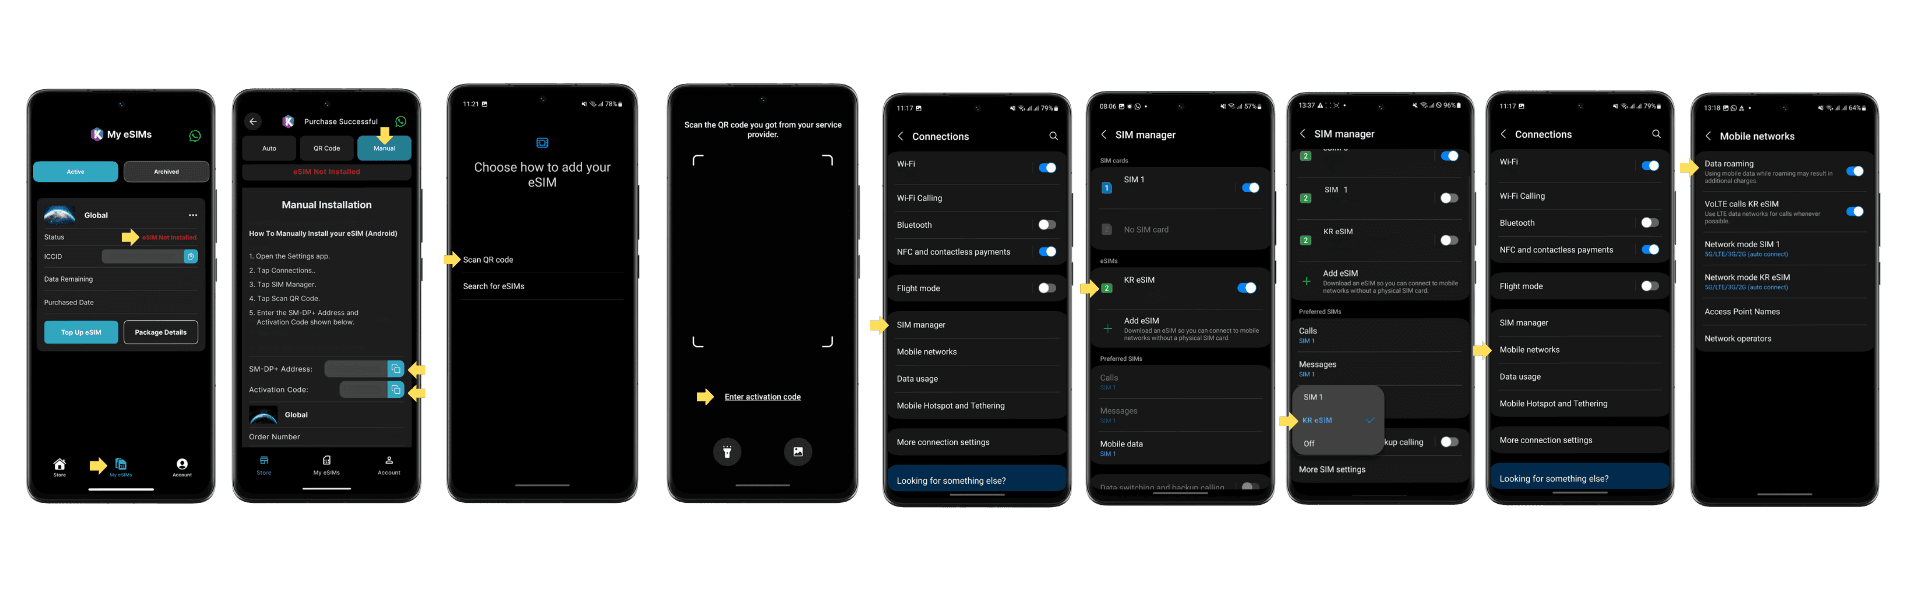
Activate your eSIM on arrival
Once you land in your destination, manually switch the eSIM on. KnowRoaming plans do not activate automatically on network connection, so this step is essential.
Samsung Galaxy
- Go to Settings > Connections > SIM Manager.
- Toggle your KR eSIM on.
- Under Mobile Data, select your KR eSIM as the active data line.
- Go to Settings > Connections > Mobile Networks and turn Data Roaming on.
Google Pixel
- Go to Settings > Network & Internet > SIMs and tap your KR eSIM.
- Toggle Use SIM on.
- Under Mobile data, set your KR eSIM as the data line.
- Turn Roaming on.
Xiaomi, OnePlus, Oppo, Motorola, Nothing
- Go to Settings > SIM Cards & Mobile Networks (Xiaomi) or Settings > Mobile Network (OnePlus, Oppo) or Settings > Network & Internet > SIMs (Motorola, Nothing).
- Toggle your KR eSIM on.
- Set the KR eSIM as your mobile data line.
- Turn Data Roaming on.
If your phone doesn't connect within 5 minutes, put it in airplane mode for 30 seconds, then turn airplane mode off. This forces a fresh network scan and resolves most "stuck attaching" messages on arrival.
KnowRoaming research: what actually goes wrong during Android eSIM setup
To understand where Android travelers get stuck, the KnowRoaming support team analysed 2,000 Android installation tickets. Most problems come down to a small number of avoidable mistakes, not faulty eSIM profiles.
Across 2,000 Android support tickets, here's what our eSIM support team most often sees:
- Data roaming not turned on: 26%
- QR code problems (expired, lost, already used): 25%
- Device not eSIM compatible: 20%
- Activated before arriving at destination: 8%
- APN settings misconfigured: 8%
- eSIM installed on wrong device: 4%
- eSIM deleted or disappeared: 3%
- No supported network found: 3%
- Install interrupted or Wi-Fi dropped: 2%
- Phone locked to carrier: 2%
- Mobile data line not set to eSIM: 1%
Two issues alone (data roaming off and QR code problems) cause more than half of all Android installation failures. If you only read three sections of this guide, make it the next three.
Issue #1: Data roaming is turned off (26% of installation problems)
This is the single most common Android eSIM problem. Many travelers believe their eSIM failed to install when the real issue is that roaming is disabled. The phone installs the profile correctly, the eSIM activates, but the connection fails because roaming is off.
Where to find the data roaming toggle by Android manufacturer
Android manufacturers each place this toggle in a slightly different menu. Use your device-specific path below.
- Samsung Galaxy: Settings > Connections > Mobile Networks > Data Roaming
- Google Pixel: Settings > Network & Internet > SIMs > [your eSIM] > Roaming
- Xiaomi / Redmi: Settings > SIM Cards & Mobile Networks > Data Roaming
- OnePlus: Settings > Mobile Network > [your eSIM] > Data Roaming
- Oppo: Settings > SIM Card & Mobile Data > [your eSIM] > Data Roaming
- Motorola: Settings > Network & Internet > SIMs > [your eSIM] > Roaming
- Nothing Phone: Settings > Network & Internet > SIMs > [your eSIM] > Roaming
If your eSIM installs but shows "no service", open your eSIM settings, turn data roaming on, and restart your phone. This resolves the connection issue in most cases within 30 seconds.
Issue #2: QR code problems (25% of installation problems)
The second biggest failure mode is related to the QR code itself. eSIM profiles are single-use, so once a QR code has been scanned, it can't be scanned again. Common causes include:
- The QR code has already been scanned on another device.
- The QR code has expired (some providers set a validity window).
- The QR code image is too small, blurry, or cropped to scan cleanly.
- The code was scanned on the wrong phone and is now locked to that device.
- The confirmation email with the code was lost or deleted.
How to fix QR code problems
- Check your order confirmation email for a fresh copy of the QR code before contacting support.
- Confirm you're installing on the device you intend to use the plan on. eSIM profiles cannot be moved once installed.
- Try the "Enter details manually" option inside your eSIM settings and paste the activation code (KnowRoaming includes both the QR code and the manual activation string in the confirmation email).
- If the code is genuinely used up or corrupted, contact KnowRoaming 24/7 multilingual support to request a replacement.
Issue #3: Your Android phone doesn't support eSIM (20% of installation problems)
One in five Android installation problems come from travelers trying to install an eSIM on a device that simply doesn't support the technology. This is more common than it should be, because eSIM support varies by region even for the same phone model. For example, Samsung Galaxy S23 and S24 devices sold in mainland China, Hong Kong and some other markets ship without eSIM support, even though the same model sold in Europe or North America has it.
Three ways to check if your Android phone supports eSIM
Method 1: the KnowRoaming compatibility checker The fastest way. Open any KnowRoaming product page on your phone, tap "Check compatibility", our eSIM compatibility checker will let you know if your device supports eSIM. The tool reads your EID and tells you instantly whether your device supports eSIM.
Method 2: dial the EID code Open your phone's keypad and dial *#06#. If an EID number appears, your device supports eSIM. No EID, no eSIM.
Method 3: check your SIM settings Go to Settings > Network & Internet > SIMs. If you see options like "Add eSIM", "Download SIM" or "Add Mobile Plan", your device is eSIM-ready.
If none of these confirm support, your phone is either too old, a region-specific variant without eSIM hardware, or a model line that hasn't adopted eSIM yet. In that case, you'll need a physical travel SIM or a hotspot option instead.
Further troubleshooting: edge cases we see at KnowRoaming support
Beyond the top three issues, a long tail of smaller problems catches travelers out. If your eSIM installs but you still don't have a working connection, work through this checklist.
Your eSIM is installed but showing "no service"
- Confirm data roaming is on for the eSIM (see the manufacturer paths above).
- Confirm your mobile data line is set to the eSIM and not your old SIM. Go to Settings > Network & Internet > SIMs > Mobile data and pick the eSIM.
- Restart your device. A fresh boot forces your phone to re-register with the network.
- Toggle airplane mode on and off. This is faster than a restart and solves most "stuck attaching" errors.
Your phone can't find a supported network
- Manually select a network. On most Android phones this lives at Settings > Network & Internet > SIMs > [your eSIM] > Mobile networks > Automatically select network (turn it off to see the list).
- Make sure your preferred network mode is set to 5G/LTE/3G auto or LTE/3G auto. Some older Android builds default to 2G only, which many networks no longer support.
- Check that you're physically in a destination covered by your KnowRoaming plan.
Your APN is misconfigured
KnowRoaming uses the APN globaldata. If your eSIM shows an active signal but mobile data won't load, check your APN settings.
- Go to Settings > Connections > Mobile Networks > Access Point Names (Samsung), or Settings > Network & Internet > SIMs > [your eSIM] > Access Point Names (Pixel and most others).
- Confirm an APN named globaldata exists and is selected.
- If not, tap Add (usually the plus icon top right), set Name to esim, set APN to globaldata (all lowercase, no spaces), save, and select it.
You activated the eSIM before arriving at your destination
If you toggle your KnowRoaming eSIM on before you land, your phone will try to register on your local home network and throw an "activation failed" message, because the eSIM isn't recognised outside its supported destinations. The fix is simple:
- Go to Settings > Connections > SIM Manager (Samsung) or Settings > Network & Internet > SIMs (Pixel and others).
- Toggle your KR eSIM off.
- Set Mobile Data back to your regular home SIM.
- Leave it off until you arrive at your destination, then follow the "Activate your eSIM on arrival" steps above.
You installed the eSIM on the wrong device
eSIM profiles are tied to the device they're installed on. You can't copy or move an active eSIM from one phone to another. If you scanned the QR on the wrong device, contact KnowRoaming support to request a replacement profile.
Your eSIM disappeared after a software update
Major Android updates occasionally wipe eSIM profiles. If this happens:
- Reinstall the eSIM using the original QR code if it's still valid.
- If the code is used up, contact support for a replacement.
- Back up your eSIM profile before future major updates, where the option is available (Samsung's Smart Switch and Google Pixel's SIM tools both support this on recent Android versions).
Your phone is carrier locked
If your device is locked to a specific carrier, the eSIM won't activate. Contact your home carrier and request an unlock before you travel. Most major operators unlock devices that are out of contract or fully paid off.
Is your Android phone eSIM compatible?
Most flagship Android phones released from 2019 onwards support eSIM, including:
- Samsung: Galaxy S20 and newer (including S20 FE, S21, S22, S23, S24, S25 series), Galaxy Note 20 and newer, Galaxy Z Fold and Z Flip series, Galaxy A54 and newer A-series models (region dependent)
- Google: Pixel 3 and newer (all subsequent Pixel models)
- Xiaomi: Xiaomi 12T Pro, 13, 13 Pro, 13 Ultra, 14, 14 Pro, 14 Ultra
- OnePlus: OnePlus 11, 12, 13, Open
- Oppo: Find X5 Pro and newer select models
- Motorola: Razr, Edge and G series from 2022 onwards (region dependent)
- Nothing: Phone (2), Phone (2a), Phone (3)
Region matters. Some Samsung Galaxy S23 and S24 models sold in specific markets ship without eSIM hardware. If in doubt, use the *#06# EID test or the KnowRoaming compatibility checker.
How to convert a physical SIM to an eSIM on Android
You can't convert an existing physical SIM into an eSIM directly on your phone. The process is carrier-led. In practice, converting a physical SIM to an eSIM means:
- Contact your home carrier and request an eSIM swap.
- Receive a new QR code or activation code from them.
- Remove your physical SIM and install the new eSIM following the steps in this guide.
For travel, you don't need to convert. You can keep your existing SIM for calls and texts and install a KnowRoaming travel eSIM alongside it as a second line. Most modern Android phones support one physical SIM and one or more eSIMs simultaneously.
How to remove or disable an eSIM on Android
If you're done with an eSIM plan or want to free up a slot for a new one:
- Go to Settings > Network & Internet > SIMs (or SIM Manager on Samsung).
- Select the eSIM you want to remove.
- Tap Remove SIM, Erase SIM, or Delete (the wording depends on manufacturer).
- Confirm the action.
Disabling (rather than removing) keeps the profile on your device but turns it off. This is useful if you travel back to the same destination regularly.
When you return home: turn off your eSIM
When your trip ends, switch the eSIM off so your phone uses your regular home SIM again. You don't need to delete the profile unless you're sure you won't use it again.
- Go to Settings > Connections > SIM Manager (Samsung) or Settings > Network & Internet > SIMs (Pixel and others).
- Toggle your KR eSIM off.
- Under Mobile Data, switch the active data line back to your regular home SIM.
- Turn Data Roaming off if you had it on.
If you're travelling again soon, keep the profile on your device. As long as your plan still has data and validity, you can reactivate it the same way you activated it the first time.
Can you use a KnowRoaming eSIM on your laptop?
Most laptops don't support eSIM hardware yet. A small number of business-class Windows laptops (certain Microsoft Surface, ThinkPad and HP EliteBook models) support eSIM directly, but support remains the exception. The simpler workaround is to use your Android phone as a mobile hotspot and share your eSIM connection with your laptop, tablet, camera, or anything else that needs Wi-Fi.
How to set up a mobile hotspot on Android
- Open Settings and tap Network & Internet (or Connections on Samsung).
- Select Hotspot & Tethering (or Mobile Hotspot and Tethering).
- Turn on Mobile Hotspot.
- Tap the hotspot name to set a custom name and secure password.
- On your laptop, connect to the hotspot like any other Wi-Fi network.
Keep an eye on data usage, especially if you're on a capped plan. Streaming, video calls and cloud backups are the biggest consumers on hotspotted devices.
Why KnowRoaming is the best eSIM for international travel
KnowRoaming has been providing international connectivity since 2013 and supports travelers across more than 200 destinations worldwide. Our travel eSIMs are built for people who want connectivity to simply work, without the usual roaming bills.
- Global and regional eSIM plans to match the shape of your trip
- Fast install via QR code or the KnowRoaming app
- No surprise roaming fees
- 24/7 human support when something doesn't go to plan
- Thousands of verified reviews from travelers in over 200 destinations
Frequently asked questions
How do I set up an eSIM on Android?
Go to Settings > Network & Internet > SIMs > Add SIM (or SIM Manager > Add eSIM on Samsung), scan the QR code from your eSIM provider, wait for the profile to install, then leave the eSIM deactivated until you arrive at your destination. On arrival, toggle it on, set it as your mobile data line, and turn data roaming on. The whole install takes under two minutes on Wi-Fi.
How long does an eSIM take to activate on Android?
Installation takes 30 to 90 seconds. Activation is a separate step: you manually toggle the eSIM on in SIM Manager (Samsung) or SIMs (Pixel and others) once you arrive at your destination, set it as your mobile data line, and turn on data roaming. The network usually registers within a minute. If it doesn't, airplane mode for 30 seconds forces a fresh scan.
How do I check if my eSIM is activated on Android?
Open Settings > Network & Internet > SIMs (or SIM Manager on Samsung). An active eSIM shows its carrier name and a signal indicator. If it shows "inactive" or "no service", check that data roaming is on and your mobile data line is set to the eSIM.
Is my Android phone compatible with an eSIM?
Most flagship Android phones from 2019 onwards support eSIM, but region matters. Dial *#06# to check for an EID number, or use the KnowRoaming compatibility checker for an instant answer.
How does an eSIM work on Android?
An eSIM is a digital SIM card built into your phone's hardware. Instead of inserting a physical card, you download a carrier profile over the internet. Android phones can store multiple eSIM profiles at once and switch between them from your SIM settings. That means you can keep your home number active while using a travel eSIM for data.
Can I transfer an eSIM from an iPhone to an Android phone?
Not directly. eSIM profiles are tied to the device they're installed on. To move a plan, you'll need a new QR code or activation from your provider. If you bought a KnowRoaming plan, contact 24/7 support and we can issue a replacement profile for your Android device.
Can I have two eSIMs active on Android at the same time?
Yes, most flagship Android phones released from 2022 onwards support multiple active eSIM profiles at once (typically up to two concurrently on Samsung Galaxy S-series and Google Pixel devices, with more stored for switching). Check your device specifications or the KnowRoaming compatibility checker for details.
How do I get the QR code for my KnowRoaming eSIM?
The QR code is in the order confirmation email you receive after checkout, and also accessible from your account dashboard on the KnowRoaming website. If you can't find it, check your spam or promotions folder, or contact 24/7 support.
Can I install the eSIM before I travel?
Yes, and we recommend it. Install on home Wi-Fi the day before you leave, then leave the eSIM deactivated in SIM Manager until you arrive at your destination. When you land, toggle it on, set it as your mobile data line, and turn on data roaming. This stops your phone trying (and failing) to register the eSIM at home.
How do I delete an eSIM from my Android phone?
Go to Settings > Network & Internet > SIMs (or SIM Manager on Samsung), select the eSIM, and tap Remove SIM or Erase SIM. This deletes the profile permanently. If you only want to turn it off temporarily, use Disable instead.
About the author
Caitlin Clark is a SEO Copywriter at KnowRoaming, specialising in travel connectivity and eSIM technology for international travellers. She has been writing about travel eSIMs since 2023 and has tested KnowRoaming profiles on Samsung Galaxy S24, Google Pixel 8 and OnePlus 12 devices across more than a few countries.
Reviewed by the KnowRoaming Connectivity Support Team, drawing on 2,000+ Android eSIM installation tickets and 12 years of international roaming experience.